wideNES - Peeking Past the Edge of NES Games
Table of Contents
In the mid 1980s, the Nintendo Entertainment System (NES) was the home console to have. Boasting the best sound, the best graphics, and the best games of any home-console to date, it pushed the envelope for what home-gaming could be. To this day, titles like Super Mario Bros., The Legend of Zelda, and Metroid are hailed as some of the best games of all time.
Well, it’s been over 30 years since the NES was released, and while those classic games have aged well, the same can’t be said for the hardware they ran on. With a screen-resolution of just 256x240, the NES didn’t give games all that much screen real-estate to work with. Nevertheless, intrepid game developers squeezed amazing, iconic worlds into NES games: the maze-like dungeons of The Legend of Zelda, the sprawling planet of Metroid, or the colorful levels of Super Mario Bros.. And yet, due to the NES’s hardware limitations, gamers only ever experienced these worlds a single 256x240 viewport at a time…
Until now.
Introducing: wideNES. A new way to experience NES classics.
wideNES is a novel technique to automatically and interactively map-out NES games, in real time.
As players move within a level, wideNES records the screen, gradually building-up a map of what’s been explored. On subsequent playthroughs of the level, wideNES syncs the action on-screen to the generated map, effectively letting players see more of the level by “peeking” past the edge of the NES’s screen. Best of all, wideNES’s approach to mapping games is totally generalized, enabling a wide range of NES games to work with wideNES right out of the box!
But how does it work?
If you’d like to try wideNES before reading up on how it works, go ahead and download ANESE. ANESE is a NES emulator I wrote myself, and at the time of writing, it’s the only emulator that implements wideNES. Fair warning though, ANESE is not the best NES emulator out there, both in terms of UI and accuracy. Most options (including enabling wideNES) are only exposed via command line, and although many popular titles work just fine, some titles might not work as expected.
How wideNES works⌗
Before diving into the details, it’s important to briefly discuss how the NES renders graphics.
Pushing Pixels with the PPU⌗
Sitting at the heart of the NES is the venerable MOS 6502 CPU. In the late 70s and early 80s, the 6502 was everywhere, powering iconic machines like the Commodore 64, Apple II, and many more. It was cheap, easy to program, and just powerful enough to be dangerous.
Complimenting the NES’s 6502 was a powerful graphics co-processor called the Picture Processing Unit (PPU). In comparison to basic video co-processors present in older 6502 based systems, the PPU was a huge step-up in usability. For example, half a decade prior to the NES’s release, the Atari 2600 used a 6502 to issue graphics commands to it’s co-processor every-single scanline, leaving little time for the CPU to execute game-logic. On the other hand, the PPU only requires a couple commands per frame, leaving plenty of time for the 6502 to deliver interesting and innovative gameplay.
The PPU is a fascinating chip, rendering graphics in a way unlike any modern GPU, and it would take a whole series of articles to fully explain how it works. Since wideNES only relies on a small subset of the PPU features to work, this brief overview of the PPU’s features should suffice:
- Resolution: 256x240px @60Hz
- Runs independently from the CPU
- Communicates with CPU using Memory Mapped I/O (address range 0x2000 - 0x2007)
- 2 rendering layers: The Sprite layer, and the Background layer
- Sprite Layer
- Sprites can be individually positioned anywhere on-screen
- Great for moving objects: player, enemies, projectiles
- Up to 64 8x8px sprites
- Background Layer
- Locked to grid
- Great for static elements: platforms, large obstacles, decoration
- Enough VRAM to store 64x30 8x8px tiles
- Effective internal resolution of 512x240, with a 256x240 viewport
- Supports hardware scrolling to change the 256x240 viewport
- PPUSCROLL register (address 0x2005) controls viewport X/Y offset
- Sprite Layer
With that incredibly brief overview out of the way, lets move on to the interesting bit: how does wideNES work?
The Basic Idea⌗
At the end of each frame, the CPU updates the PPU on what has changed. This involves setting new sprite positions, new level data, and —crucially for wideNES— new viewport offsets. Since wideNES runs in an emulator, it’s really easy to track the values written to the PPUSCROLL register, which means it’s incredibly easy to calculate how much of the screen has scrolled between any two frames.
Hmm, what would happen if instead of painting each new frame directly over the old frame, new frames are instead painted overlapping the previous frame, but offset by the current screen scroll? Well, over time, more and more of the level would be left on-screen, gradually building up a complete picture of the level!
To test if the idea had any merit, I jumped right in and hacked together a first implementation.
Compile… Run… Load Super Mario Bros.…
Voila!
It worked!
Well… Kinda.
Tangent: Why not extract levels directly from ROMs?⌗
Without even going into the details of wideNES’s implementation, it should be obvious that the technique has a major limitation: A complete map of the game is only possible if a player manually explores the entire game.
What if there was some way to extract levels from raw NES ROMs? Could such a technique even exist?
Nah, probably not.
If you take any 2 NES games, there is only 1 thing they are guaranteed to have in common: they both run on an NES. Other than that, all bets are off! This inconsistency is a real pain, since there are essentially limitless ways for NES games to store level data.
While some folks have extracted complete levels by reverse engineering how a couple of games store level data (sometimes making full-fledged level editors!), doing so is far from simple, requiring plenty of hard work, dedication, and clever thinking.
Trying to extract level data from a NES ROM would be equivalent to determining which sections of the ROM are code (as opposed to data), which is hard, since finding all code in a given binary is equivalent to the Halting problem.
wideNES takes a much simpler approach: Instead of guessing how games pack level data in ROM, wideNES will simply run the game and watch the output!
Scrolling past 255⌗
The NES is a 8-bit system, which means the PPUSCROLL register only accepts 8-bit values. This limits the maximum scroll-offset to just 255px, i.e: the largest 8-bit number. Not-so coincidentally, the NES’s screen resolution is 240x256 pixels, so a 255px offset is just-enough to scroll the entire screen.
But what happens about scrolling past 255?
First, games will reset the PPUSCROLL register to 0. This explains why SMB would bounce-back to the start whenever Mario moved too-far right.
Next, to compensate for PPUSCROLL’s 8-bit limitations, games will updates a different PPU register: PPUCTRL (address 0x2000). The bottom 2 bits of PPUCTRL define the “origin” of the current scene in full-frame increments. For example: writing a value of 1 shifts the viewport right by 256px, a value of 2 will shift the viewport down by 240px. This PPUCTRL offset stacks with the PPUSCROLL register, enabling the screen to scroll up to 512px left-to-right, or up to 480px top-to-bottom.
But hold on a sec, isn’t there only enough VRAM for 2 screens-worth of level? What happens when the viewport scrolls too far to the right and “overshoots” VRAM? To handle this case, the PPU implements wrapping behavior, so that any sections of the viewport outside of designated VRAM will simply wrap-around to the opposite-end of VRAM.
This wrapping behavior, in conjunction with some clever PPUSCROLL and PPUCTRL manipulation, allows NES games to give the illusion of infinitely tall/wide worlds. By lazily-loading in more of the level ahead of the viewport, and gradually scrolling into it, players never realize that they are actually just “running in circles” within VRAM!
This excellent illustration from the nesdev wiki shows how Super Mario Bros. uses these features to have levels longer than 2 screens:
To get back to the question at hand: how does wideNES handle scrolling past 256?
Well, to be perfectly honest, wideNES completely ignores the PPUCTRL register, and simply looks that the PPUSCROLL delta between frames!
If PPUSCROLL unexpectedly jumps up to ~256, that typically indicates that the player character moved left/up a screen, whereas if it unexpectedly jumps down to ~0, that typically indicates that the player moved right/down a screen.
While this heuristic might seem simple, it actually works great!
After implementing the heuristic, Super Mario Bros., Metroid, and many other games worked near-perfectly.
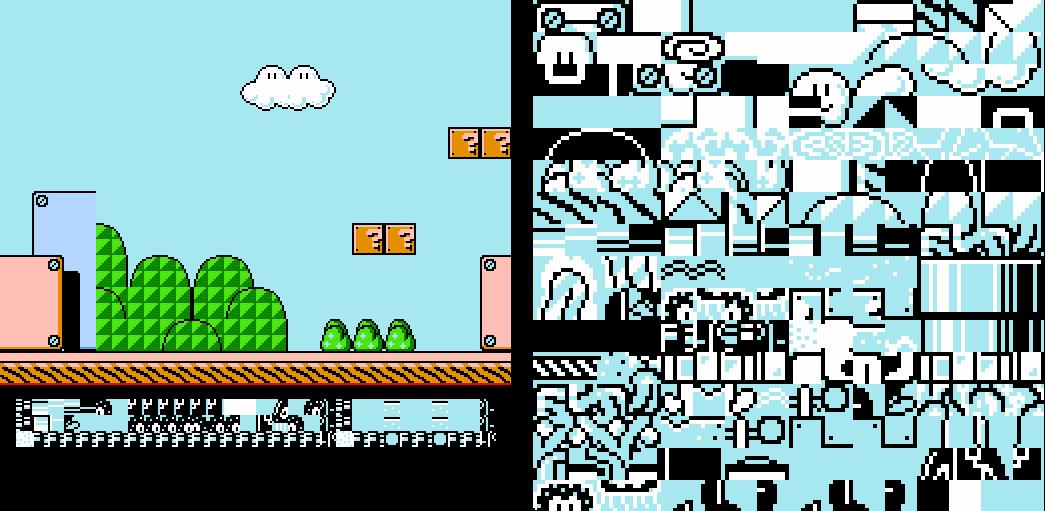
I was excited, so I went ahead and loaded up another NES classic, Super Mario Bros. 3….
Hmm… That’s not good.
Ignoring Static Screen Elements⌗
Many games have static-UI elements at the edges of the screen. In SMB3’s case, there is a blue column on the left-side of the screen, and a status-bar at the bottom of the screen.
By default, wideNES samples in 16-pixel increments from the edges of the screen, which means any static elements at the edges are sampled. Not good!
To work around this issue, wideNES implements several rules and heuristics that try to detect and mask-off static screen elements automatically.
In general, there are 3 different types of static screen elements used in NES games: HUDs, Masks, and Status Bars.
HUDs - Non-issue⌗
If a game overlays it’s HUD on-top of the level, chances are the HUD is comprised of several Sprites. Eg: the HUD in Metroid.
Thankfully, these HUDs are a non-issue, as wideNES simply ignores the sprite layer at the moment. Nice!
Masks - Easy Peasy⌗
The PPU has feature which allows games to mask-off the leftmost 8px of the background layer. It is activated by setting the 2nd bit of the PPUMASK register (address 0x2001). While many games use this feature, explaining why they do so is outside of the scope of this article.
Detecting if the mask is on is incredibly simple: wideNES simply watches the value of PPUMASK, and ignores the leftmost 8px whenever the 2nd bit of the register is set.
Implementing this simple rule seemed to fix SMB3:
…well, almost.
Status Bars - The tricky bit⌗
Due to PPU limitations, there can only be 64 sprites on-screen at any give time, and furthermore, there can only be 8 sprites on a particular scanline at any given time. This limitation discourages games from building complex HUDs from sprites, and pushes games to use segments of the background layer to display information.
Aside from masks, the PPU doesn’t really provide any easy way to divide the background layer between the play-area and the status-area. As such, games got creative, leading to a multitude of unorthodox ways to create status bars…
wideNES implements several different heuristics to detect different-types of status bars, but in the interest of time, I’ll touch upon one of the more interesting heuristics: Mid-Frame IRQ tracking.
Mid-Frame IRQ Tracking⌗
Unlike modern GPUs, which have large internal framebuffers, the PPU has no frame-buffer whatsoever. To save on space, the PPU stores scenes as a grid of 64x32 8x8 pixel tiles. Instead of resolving the pixel data ahead of time, tiles are stored as pointers into CHR Memory (Character Memory), which contains the actual pixel data.
Since the NES was developed in the 80s, the PPU was not built with modern display technology in mind. Instead of rendering full-frames at a time, the PPU outputs NTSC video designed to be displayed on a CRT, which outputs video pixel by pixel, scanline by scanline, top to bottom, left to right.
Why is all this important?
Well, since the PPU renders frames top-to-bottom, scanline-by-scanline, it is possible to send the PPU instructions mid-frame to create otherwise “impossible” video effects. These effects could be as simple as changing the palette, or as advanced as — you guessed it — creating Status Bars!
To explain how mid-frame PPU writes can generate Status Bars, I’ve captured a raw dump of a slice of the PPU’s VRAM and CHR Memory at a scan-line 195 while playing SMB3 (as denoted by the red line in the graphic below):
Everything looks normal, nothing fancy… except look at the Status Bar - It’s completely garbled!
Now, look at the same raw dump, but captured after scanline 196…
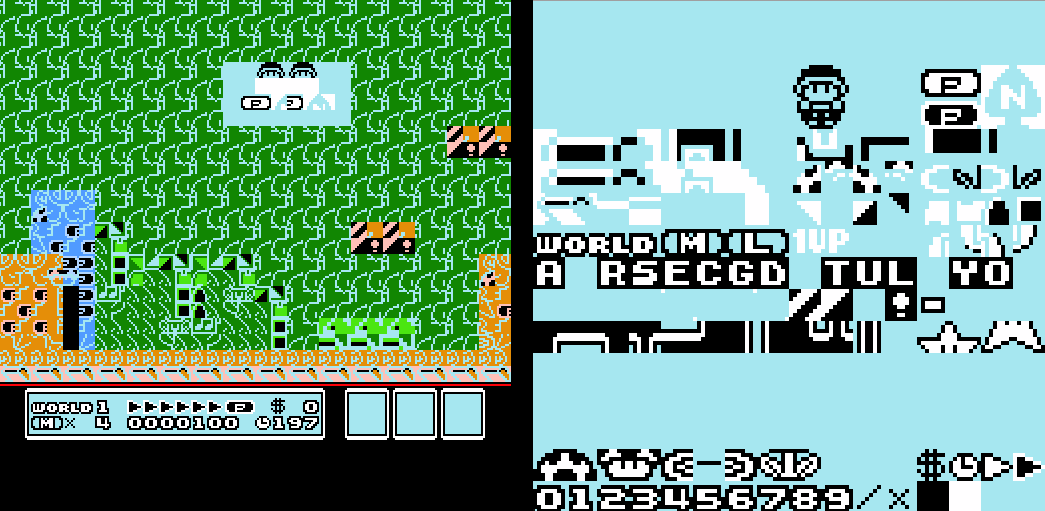
Yes, the level looks terrible, but the status bar is completely intact!
What’s going on??
SMB3 sets a timer to fire an IRQ precisely after rendering scanline 195. It puts the following instructions in the IRQ handler:
- Set PPUSCROLL to (0,0) (ensuring a fixed status bar)
- Swap the tilemap in CHR Memory (un-garble the status-bar’s graphics)
Since the rest of the level has already been rendered, the PPU won’t “retroactively” update the already rendered scan-lines. Instead, it will keep-on rendering with these new parameters, thereby outputting a nice, ungarbled status bar.
To get back to wideNES - by listening for any mid-frame IRQs and noting the scanline at which they occurred at, wideNES can ignore any subsequent scan-lines in the recording. Alternatively, if the IRQ occurs at a scanline less than 240 / 2, all previous scan-lines are ignored, as an early scanline IRQ implies there could be a status bar at the top of the screen.
Once this heuristic is in-place Super Mario Bros. 3 works perfectly!
I briefly considered using a Computer Vision library such as OpenCV to detect status-bars (and other mostly-static regions of the screen), but I eventually decided against it. Using a huge, complex, and opaque Computer Vision library ran opposite to the ethos of wideNES, which tries to rely on small, simple, and transparent rules and heuristics to achieve results.
Detecting “Scenes”⌗
Aside from a few notable examples (such as Metroid), NES games tend not to take place within a single huge, uninterrupted level. Instead, most NES games are split into many smaller, separate “scenes” with doors or transition screens to move between them.
Since wideNES has no concept of “scenes,” bad things happen when scene changes occur…
For example, here is the first scene transition in Castlevania, where Simon Belmont enters Dracula’s castle:
Oh, that’s not good. wideNES completely overwrote the last bit of the level with the first bit of the new level!
Clearly, wideNES needed some way to detect when a scene changes. But how?
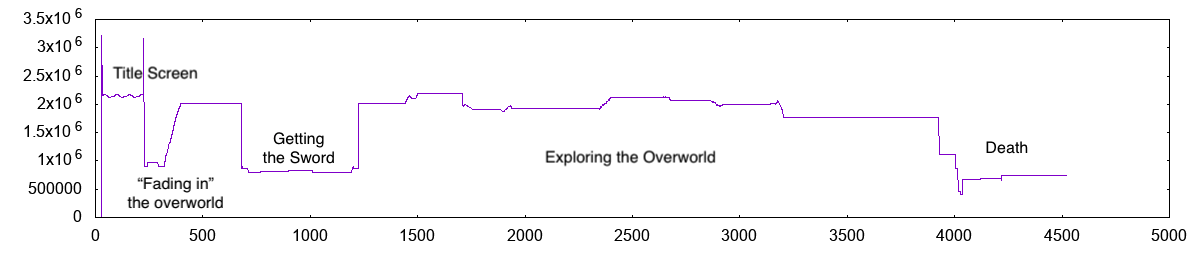
Perceptual Hashing!
Unlike cryptographic hash functions, which seek to scatter similar inputs randomly across the output space, perceptual hash functions strive to keep similar inputs “close” to one another in the output space. This makes perceptual hashes perfect for detecting similar images.
Perceptual hash functions can get incredibly complex, with some being able to detect similar images even if one has been rotated, scaled, stretched, and color shifted. Fortunately, wideNES doesn’t need a complex hash function, since each frame is guaranteed to be the exact same size. As such, wideNES makes use of probably the simplest perceptual hash out there: summing up every pixel on-screen.
It’s simple, but it works pretty well!
For example, look how much the scene transitions stand-out when plotting the perceptual hash over time in The Legend of Zelda:
At the moment, wideNES uses a fixed-threshold between perceptual hash values to trigger a scene transition, but this is far from ideal. Different games can use different palettes, and there are many cases when wideNES thinks there is a scene transition when there isn’t. Ideally, wideNES should use a a dynamic-threshold, but at the moment, a fixed-threshold will do.
With this new heuristic in place, wideNES effectively detects Simon entering the castle in Castlevania and switches to a fresh-canvas appropriately.
And with that, the final big puzzle-piece of wideNES slid into place.
After implementing some basic serialization, I was finally able to boot-up a NES game, play though some levels, and automatically generate maps of various levels.
What’s next for wideNES?⌗
wideNES is composed of two distinct parts: wideNES Core, which is the actual rules/heuristics behind the technique, and the concrete implementation of wideNES within ANESE.
Improving wideNES Core⌗
First of all, wideNES tends to detect scene transitions too aggressively. The number of false-positives could be minimized by using a better perceptual-hashing algorithm, or by switching to a dynamic-threshold between perceptual-hashes.
Detecting static screen elements also needs more work. For example, Megaman IV has a mid-frame IRQ, but no status bar, leading wideNES to mistakenly ignore a sizable chunk of the playfield. While that particular case can be fixed with some manual adjustment, it would be better to have smarter heuristics instead.
Several NES games scroll the screen in “unique” ways. One high-profile example of this is The Legend of Zelda, which uses PPUSCROLL to scroll horizontally, yet scrolls vertically using a totally different register, PPUADDR. Zelda is a pretty popular title, so wideNES implements a heuristic just for Zelda. There are other games with similar “unique” scroll modes which would also require custom heuristics.
It would be useful to have some way to “stitch-together” identical scenes. For example, if one plays through Super Mario Bros. Level 1, but takes the pipe to the underground coin-stash, wideNES will create two separate scenes for Level 1: Scene A, the level up-to the point where Mario enters the coin-zone, and Scene B, the level from when Mario exits the pipe to the flagpole. If the game is then reloaded and Level 1 is replayed without entering the pipe, wideNES will just simply update Scene A to have the full full-level, but leave Scene B “dangling.”
Lastly, wideNES should keep-track of scene-transitions. With that data, it would be possible to build a graph of scene transitions, making it possible to generate world-maps for games that are not composed of a single, large world.
Improving ANESE’s wideNES implementation⌗
At the moment, wideNES’s only implementation is within ANESE, a NES emulator I wrote myself. ANESE is a very, very spartan emulator, with most options hidden behind CLI flags, and with the only UI implemented being a basic file-picker overlay. It is far, far from “production ready.”
Aside from the UI though, ANESE and wideNES could both use some compatibility and performance improvements. ANESE was the first large emulator I’ve written, and it shows!
There are quite a few compatibility issues, with several games playing incorrectly / not booting at all. Fortunately, just because ANESE isn’t a great emulator, does not mean that wideNES is a bad technique. The principles wideNES relies on are solid, and should be easy to implement in other emulators!
Performance wise, ANESE and wideNES are not the greatest, and even some relatively powerful PCs can sometimes dip below 60fps. There are many optimizations that should be implemented in ANESE and wideNES. Aside from general improvements in ANESE core, there are lots of improvements to how wideNES records frames, renders the map, and samples hashes.
Conclusion⌗
While I’ve discussed the major aspects of how wideNES works, there many smaller techniques that I wasn’t able to cover. For example, wideNES keeps a map of each frame’s true-hash and it’s scroll values, which are used to allow “reentrant” scenes. This feature, and many more, are described in the heavily-commented source for wideNES, available on the wideNES project page.
Working on wideNES has been a truly awesome experience, but with another semester at the University of Waterloo right around the corner, I doubt I’ll get the chance to work on wideNES for a while. wideNES is at a point where it mostly works, and I’m glad I could write this post discussing some of the tech behind it.
Try wideNES yourself, and tell me what you think! Download ANESE, boot up some Super Mario Bros., or The Legend of Zelda, or Metroid, and have some fun!
Updates (Dec 2024)⌗
Its been almost 7 years since I published this blog post about wideNES (wow, time flies!), and I thought it might be fun to revisit it - for old times sake.
I’ve added this new ‘Updates’ section, where I discuss some of the interesting coverage that the project received after its release, as well as pointing out notable examples of follow-up work that was inspired by and/or leveraged wideNES.
Alongside adding this new section, I did do some minor editing to the contents of the main article - I reduced the number of exclamation-points in the blog post by nearly a factor of 2x. 2018 me was clearly very excited to share this work, but in hindsight, all those exclamation-points made reading through this blog post very tiring! Note that the actual content hasn’t changed - just some of the punctuation.
1. Initial Online Coverage / Discourse (August 2018)⌗
After publishing this blog post, I was thrilled to see the positive and insightful coverage and attention that wideNES received from the online community!
wideNES reached the front-page of both Hacker News and /r/programming, and was featured in publications like Ars Technica and hackaday (the latter being particularly exciting for me, as I’ve been an avid reader of Hackaday since I was in my early teens!).
It was awesome seeing the positive reactions from folks about this cool little hack!
2. WideGB (April 2019)⌗
Shortly after I published my work on wideNES, Pierre de La Morinerie (kemenaran) applied the concepts from wideNES to another classic Nintendo system - the GameBoy (and GameBoy Color) - and released WideGB.
I had a chance to send my kudos over to kemenaran in a Reddit thread announcing WideGB. I wholeheartedly recommend folks take a look through our exchange, as kemenaran touches on some of the interesting low-level technical details of how WideGB works that aren’t discussed in depth in his announcement blog post.
Courtesy of kemenaran, via WideGB: playing Game Boy games on wide screens
3. Mappyland (October 2021)⌗
In 2021, some researchers from the California State Polytechnic University, Pomona, published a paper called MappyLand: Fast, Accurate Mapping for Console Games. In their words:
Some of the techniques used in MappyLand —– in particular, parts of the in-game camera tracking algorithm —– were pioneered in WideNES (Prilik 2020)
Who would’ve thought that little ‘ol me would be cited in an honest-to-goodness academic white-paper? That’s pretty cool!
If you finished reading my writeup on wideNES and were hoping for some more deeply technical content about automatically mapping out NES games, I strongly suggest you give this paper a read through. Its surprisingly digestible and easy reading - a great little whitepaper for anyone interested in the art of mapping out retro games!
4. Linus Tech Tips (May 2024)⌗
The Linus Tech Tips YouTube channel recently did a video about an abnormally wide widescreen monitor they managed to procure… and look what project made a surprise appearance mid-way through the video!
The cameo is pretty brief, but nonetheless quite nifty.
That said - Linus did touch on a key aspect of the wideNES technique that I believe made it impractical for everyday use, and limited its broader adoption across the emulation community…
5. Mainstream Support (or, the lack thereof)⌗
As cool as wideNES is from a technical perspective, it suffers from one major flaw that makes it quite annoying to actually use as a player - it cannot handle off-screen sprites.
This limitation makes actually using wideNES to play games incredibly annoying, as enemies are only ever visible in the small part of the screen surrounding your character, and then simply vanish / appear out of thin-air as the viewport moves around the screen!
My personal opinion is that this limitation is the primary reason no mainstream emulator - NES or otherwise - has invested significant resources into “productizing” wideNES for general use.
Unfortunately, due to the nature of the problem, it seems unlikely any sort of “simple” heuristic in the vein of those employed by wideNES will be able to track off-screen sprites (at least, not in any reasonable way, that avoids having enemies “freeze in place” when off-screen). Who knows, maybe AI is the answer?
Next Steps?⌗
There’s still a chance that I’ll one-day find a nice chunk of free time to revisit wideNES. In-fact, I’ve already started tinkering with a platform-agnostic wideNES-like layer on-top of Libretro, which would make it a lot easier to port wideNES to any system with a Libretro core.
My north-star is to eventually play the original GBA Advance Wars games in widescreen… but I guess we’ll have to see if that ever ends up happening.
Thanks for reading!