Paravirtualized Devices in crosvm - a Performance Panacea for Modern VMs
Table of Contents
This winter, while interning on the ChromeOS team at Google, I got the chance to work on Crostini: the collection of tools and infrastructure that enables ChromeOS to run Linux applications within a secure, sandboxed environment. Crostini gives users a local Debian-based Linux environment with everything one would expect from a standard Linux installation, such as shell access, root-privileges, permission to install packages, etc… To maintain the strict security model of ChromeOS, this environment lives within a container, within a virtual machine. This double-encapsulation helps to ensure that even if the Linux installation is compromised, the rest of user’s system isn’t compromised along with it.
Sitting at the heart of the Crostini project is crosvm, a Virtual Machine Manager written from the ground-up to run lightweight, secure, and performant Linux VMs. crosvm is a lot like VirtualBox or QEMU, except for the fact that it’s written in a memory-safe language (Rust!), and that it only implements just enough functionality to run Linux VMs (i.e: you won’t be running TempleOS on crosvm anytime soon).
While crosvm was the first Virtual Machine Manager (VMM) written in Rust, it definitely won’t be the last. Rust’s strong memory and data-race safety, expressive syntax, and excellent C interoperability makes it a fantastic language for writing VMMs. You might have heard about crosvm’s more publicized-about cousin, Firecracker, which is a fork of crosvm that’s being developed by Amazon to speed up their serverless infrastructure. Well, in December 2018, employees from Intel, Red Hat, and Alibaba also joined in on the fun, and created the rust-vmm working group. rust-vmm seeks to standardize the basic building blocks of VMMs written in Rust, making it a lot easier to write a custom VMM tailored for any use-case!
Suffice it to say, it’s an incredibly exciting time to be working on VMs!
During my internship, I got the chance to work on crosvm directly, and in doing so, I learned a lot about the low-level details of how VMs work. As you might expect, there’s a whole world of complex and incredible code that powers the VMs we use today. Today, I’ll be diving into just one aspect of that infrastructure: paravirtualized devices.
Paravirtualized devices are the “secret sauce” that enable modern VMs to reach near-native speeds in IO heavy workloads such as file access, networking, and graphics output. In a nutshell, by informing virtualized OSs of the fact that they’re running within a VM, OSs can make use of special paravirtualized device drivers. Unlike regular device drivers, which try to communicate with physical hardware and therefore require an expensive hardware emulation layer to work correctly in a VM, paravirtualized drivers directly communicate and cooperate with the VM, resulting in some incredible performance gains!
If you’re interested in learning a more about this fascinating aspect of VM infrastructure, and walking through a hands-on example of how modern hypervisors like crosvm implement both virtual and paravirtualized devices, keep reading!
Virtual Machines - An Overview⌗
Lets start off with a pretty high-level question: What is a virtual machine?
Simply put, a virtual machine (VM) is a computer that isn’t directly tied to any physical hardware. VMs run operating systems on virtual CPUs (VCPUs) with their own virtual address spaces and virtual devices, presenting OSs with an environment that looks and feels like physical hardware, but is actually created entirely within software! By abstracting away any concrete physical hardware, VMs make it possible for a single computer to run multiple virtualized OSs simultaneously, enabling seemingly impossible feats such as running Windows within a window!
Hypervisors are the programs responsible for setting up and managing VMs, with a single hypervisor “host” typically managing one or more individual VM “guests.” Some well-known hypervisors include VirtualBox, VMware, Parallels, and QEMU, but there are also plenty of smaller hypervisors being developed today… like crosvm!
So how does crosvm work?
Well, to grossly oversimplify things: crosvm allocates some memory, loads a Linux kernel into that memory, and hands it off to the KVM kernel API to create a VM with some number of VCPUs.
KVM, the Kernel-based Virtual Machine, is a Type 1 hypervisor that’s built directly into the Linux kernel itself. A Type 1 hypervisor runs on the “bare-metal,” and as such, is able to set up and make use the hardware-assisted virtualization technologies available on most modern CPUs, such as Intel’s VT-x, or AMD’s AMD-V. These hardware extensions can be used to run VCPUs directly on real hardware, resulting in a massive boosts to VM performance!
But KVM can’t work alone. Although it’s is well-equipped to handle the VCPU accesses to / from regular RAM-backed memory addresses, KVM has [almost1] no idea how to handle VCPU accesses to devices. Devices, at least for the purposes of this article, are all the hardware components a VCPU interacts with that aren’t RAM. i.e: things such as keyboards, mice, disk-controllers, graphics cards, etc…
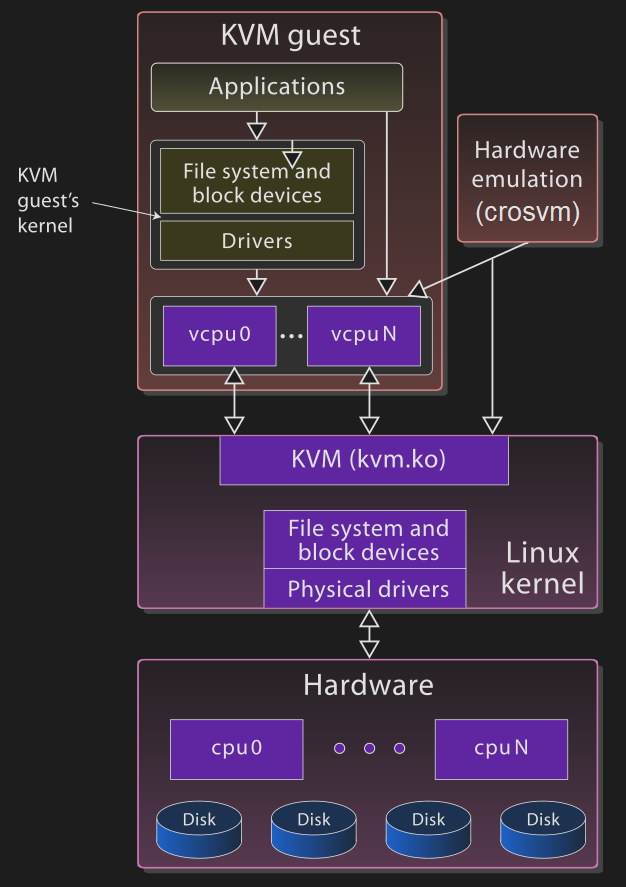
A high-level overview of the KVM/crosvm virtualization environment. Modified with permission from original Wikimedia image.
And this is where crosvm comes in.
crosvm is a Virtual Machine Manager (VMM), or Type 2 hypervisor, which runs entirely in userspace and works in tandem with KVM’s kernel component to set up and execute VMs. crosvm defines the virtual hardware platform and memory-layout of a VM, manages the execution lifecycle of the VM, and most importantly for this article, implements the logic required to handle the device accesses KVM cannot handle.
Virtual Devices - The Cornerstone of Virtualization⌗
One common way that CPUs access devices is through the use of Memory Mapped IO (MMIO), an architecture whereby certain regions of the CPU’s memory space correspond to registers on connected devices. This makes accessing devices simple, as the CPU can reuse it’s existing load / store instructions to talk to connected devices.
The technique works great in non-virtualized contexts, where the CPU is fully privileged and has unhindered access to these special memory addresses. Unfortunately, VCPUs aren’t privileged, so whenever a VCPU attempts to access one of these hardware registers, KVM must pause the VCPU’s execution and somehow handle the request. Since it can’t handle the request itself, KVM yields execution to crosvm, notifies it that a VMEXIT event has occurred, and waits until crosvm fulfills the request.
Since crosvm the exact address of the invalid access that caused the VMEXIT, it can look-up an appropriate virtual device to handle the access. Virtual devices emulate the hardware interface of some existing physical device, reimplementing its functionality in pure software. For example, lets say the VCPU tries to read a byte from a serial controller hardware register via MMIO. The hypervisor would catch the invalid access, pause the VCPU, and call a virtual serial controller to handle it. The virtual serial controller might then read some data from a TTY, and return the latest available byte back to crosvm. Prior to resuming the VCPU, crosvm would modify the VCPUs state to make it look like its hardware access succeeded, thereby spoofing the guest OS into thinking it successfully accessed an actual hardware register!
While this technique is conceptually simple to implement, it does come with one big caveat: VMEXITs are incredibly expensive. You thought CPU context switches between processes were bad? Imagine CPU context switches between entire operating systems!
The overhead of continuous VMEXITs can absolutely cripple VM performance, especially when emulating high-throughput devices such as network cards or disk controllers.
If only there was some way to avoid these expensive context switches…
Paravirtualization - A Performance Panacea⌗
In traditional virtualization, guests have no idea they are being virtualized. In paravirtualization, guests know that they’re being run in a VM, which offers up a whole world of optimization opportunities. Instead of using regular device drivers, OSs can implement paravirtualied drivers that are clever enough to avoid VMEXITs entirely!
Paravirtualized device drivers really are a performance panacea for VMs, especially when dealing with high-throughput tasks like disk IO or networking.
While there are many different ways of implementing paravirtualized devices (such as Xen, VMware Tools, VirtualBox Tools, etc…), I’ll be taking a look at virtio, a popular and open standard for writing paravirtualized devices and drivers. virtio is lightweight, performant, and easy to reason about, making it perfect for small, lightweight, performant hypervisors like crosvm.
To get a better idea of how virtual and paravirtualized devices work, and see first-hand how paravirtualized devices can dramatically improve VM performance, let’s see how a virtual device might be replaced with a virtio paravirtualized device.
Case Study - A RNG Device⌗
One useful feature provided by the Linux kernel is random number generation (RNG).
By reading from the /dev/urandom special file, Linux programs can access a seemingly never-ending stream of random bytes.
Typically, the Linux kernel seeds it’s RNGs using the randomness of things such as user keyboard / mouse input, or the minor variations in spinning-disk access times. Unfortunately, these sources of entropy tend to be hard to come by in VMs.
Another way to boost the entropy of a Linux machine is by providing it with a physical hardware random number generator (HRNG). These devices use physical processes to generate randomness.
Lets consider two different ways to we might implement a virtual HRNG device. Under the hood, both virtual device will simply read from the host’s /dev/urandom, but they will differ in how they relay that information back to the VM:
- The first device will emulate the interface of some physical MMIO’d hardware random number generator (HRNG) device
- The second device will use virtio to directly return random data from the host
I’ll be walking though how these devices could be implemented in crosvm, but if you’re curious, similar implementations can be found in other hypervisors too (like this one from QEMU).
Note: Paravirtualizing an RNG device probably won’t dramatically increase a VM’s performance (that is, unless the VM continuously reads from /dev/urandom). That said, RNG devices are very simple to implement, which makes them perfect example for illustrating the principles behind virtual and paravirtualized devices. These same concepts apply to other, more complicated paravirtualized devices such as block devices or network cards, which do dramatically increase performance.
A Virtual HRNG Device - rngboi-1337.rs⌗
Lets imagine we have a physical RNG device, the RNGBOI-1337, that generates random data from the modial interactions of magneto-reluctance. The RNGBOI-1337 is dead-simple: a single 32bit rng0 register at device offset 0 returns a random number whenever it’s read.
Since the RNGBOI-1337 is so simple, the Linux kernel has a built-in driver that seeds the Linux entropy pool by reading from rng0. Awesome!
When creating our VM, we’ll specify that a RNGBOI-1337 exists and is accessible as a MMIO device at address 0x80001000, and we’ll implement a virtual device called rngboi-1337 to handle any requests.
Note: I’ll be glossing over how exactly the OS finds out about the existence of its connected device, and the specific implementation details of the guest Linux RNG driver, as those details can be surprisingly complicated. Suffice it to say, the Linux VM will attempt to read a random number from MMIO address 0x80001000 at some point during it’s execution.
Let’s see how crosvm would implements rngboi-1337.
VcpuExit::MmioRead⌗
The VCPU is chugging along, happily executing instructions, when all of a sudden it tries to access the RNGBOI-1337. KV immediately stops the VCPU, yields control back to crosvm, and informs it that the VCPU tried to read from a particular MMIO address.
The relevant bit of code in crosvm that handles VCPU MMIO reads is pretty straightforward:
// crosvm/src/linux.rs:996
'vcpu_loop: loop {
    // Run the VCPU
    match vcpu.run() {
        // The VCPU is reading `size` bytes from a MMIO `address`:
        Ok(VcpuExit::MmioRead { address, size }) => {
            // allocate a buffer big enough for the read...
            let mut data = [0; 8];
            // ... and fill the buffer by reading from the MMIO bus.
            mmio_bus.read(address, &mut data[..size]);
             // Finally, push that return value back to the VCPU.
            let _ = vcpu.set_data(&data[..size]);
        }
        // ...
    }
    // Continue looping to resume the VCPU...
}
Looks like we need to place a virtual RNGBOI-1337 device onto the mmio_bus at address 0x80001000!
Virtual Devices in crosvm⌗
BusDevice is the trait (Rust lingo for interface) that all virtual devices must implement:
// (simplified from) crosvm/devices/src/bus.rs:19
pub trait BusDevice: Send {
    /// Reads at `offset` from this device
    fn read(&mut self, offset: u64, data: &mut [u8]) {}
    /// Writes at `offset` into this device
    fn write(&mut self, offset: u64, data: &[u8]) {}
}
This makes sense: given an offset from the base-address of the device, read / write some number of bytes from the devices registers.
Implementing rngboi-1337⌗
What might a virtual RNGBOI-1337 device in crosvm look like?
// (would be at) crosvm/devices/src/rngboi-1337.rs
// simplified for brevity
use std::fs::File;
use crate::BusDevice;

const RNG0_REG: u64 = 0;

/// A rngboi-1337 HRNG device
pub struct Rngboi1337 {
    random_file: File,
}

impl Rngboi1337 {
    /// Constructs a new rngboi-1337 device pointing to /dev/urandom
    pub fn new() -> Cmos {
        Rngboi1337 {
            random_file: File::open("/dev/urandom").unwrap();
        }
    }
}

impl BusDevice for Cmos {
    fn read(&mut self, offset: u64, data: &mut [u8]) {
        match offset {
            // read data directly from /dev/urandom directly into the buffer
            RNG0_REG => self.random_file.read_exact(data).unwrap();
            o => panic!("bad read offset on rngboi-1337 device: {}", o),
        }
    }

    // no need to implement write, default no-op functionality is just fine
}
…and that’s it! It’s short, sweet, and to the point. The code pretty-much speaks for itself.
Instantiating rngboi-1337⌗
At some point during VM instantiation, crosvm adds the rngboi-1337 device to the MMIO bus, which ends up being as simple as:
// Bus::insert(device, base, len (in bytes));
mmio_bus.insert(Rngboi1337::new(), 0x80001000, 1);
Now, whenever the VCPU reads from 0x80001000, crosvm calls the rngboi-1337 read method, reads some data from /dev/urandom, and successfully fulfill the VCPUs read request. Nice!
rngboi-1337 Performance⌗
While this new virtual device was easy to write, easy to grok, and easy to maintain, it will end up absolutely crippling performance whenever the VM reads lots of random data.
Say the VM tries to fill a buffer with random bytes by reading from a connected RNGBOI-1337 device:
// somewhere in the linux kernel
#define RNGBOI_RNG0 ((u32*)0x80001000)

u32 buf [512];
for (int i = 0; i < 512; i++) {
    buf = *RNGBOI_RNG0;
}
Unfortunately, since rngboi-1337 must conform the physical interface specified by the physical RNGBOI-1337 device, it can only transfer a single byte of data each time it’s accessed. And therein lies the problem:
Every. Single. Access. Results. In. A. VMEXIT.
If only there was some alternative RNG device that wasn’t limited to emulating a piece of existing physical hardware…
A Paravirtualized RNG Device - virtio-rng⌗
The virtio spec describes the setup and management of virtqueues - lockless data structures that provide asynchronous communication between guest drivers and host devices. Virtqueues reside in some a RAM-backed guest memory region, one where guests read/write from without triggering a VMEXIT. Since the hypervisor is able to access the entirety of guest memory (after all, it is hyper-privileged), it monitors the queues for any incoming requests, and responds by writing responses directly back into the queues.
The virtio spec defines a simple virtio-rng device that enables guests to request large amounts of random data from a host. Its interface is incredibly straightforward:
- The guest driver places a pointer to a buffer it wants filled with random data onto the device’s single virtqueue.
- The host device monitors the queue, and whenever a new buffer appears, writes random bytes into the specified buffer.
- The guest driver is notified once the buffer is filled.
To keep things focused, I won’t be covering the details of how the virtio-rng Linux kernel driver works under the hood, and instead, I’ll be focusing on the host-side device implementation. Suffice it to say that, the kernel driver manages to set up the virtio-rng virtqueue, and begins to request data through it.
Lets see how crosvm goes about implementing virtio-rng.
virtio Devices in crosvm⌗
Similarly to how crosvm’s BusDevice trait makes it easy to create new virtual devices, crosvm’s VirtioDevice trait that makes it easy to create virtio paravirtualized devices.
The VirtioDevice trait abstracts away most of the nitty-gritty details required to set up virtio devices (as outlined in this lengthy section of the virtio spec), and exposes an easy-to-use interface with overridable methods that specific virtio devices fill-in.
crosvm also provides an incredibly useful abstraction over virtqueues, aptly called Queue, which makes the virtqueues a lot easier, including creating an iterator interface for the virtqueue that makes reading incoming requests quite straightforward.
// (greatly simplified from) crosvm/devices/src/virtio_device.rs
pub trait VirtioDevice: Send {
    /// The virtio device type.
    fn device_type(&self) -> u32;

    /// The maximum size of each queue that this device supports.
    fn queue_max_sizes(&self) -> &[u16];

    /// Activates this device for real usage.
    fn activate(
        &mut self,
        mem: GuestMemory,
        queues: Vec<Queue>,
        queue_evts: Vec<EventFd>,
    );
}
For the purposes of this discussion, I’ve omitted and simplified many of the methods present on the actual VirtioDevice trait. The methods presented above comprise the minimum required interface that virtio devices must implement. The rest of the methods deal with more complex device configuration and crosvm implementation details.
Lets go over what each of these methods is responsible for:
device_type is called during device setup, and determines what type of virtio device the VirtioDevice implements. The virtio spec assigned each type of virtio device a unique id. For example, a virtio network card (virtio-net) has an id of 1, and a virtio entropy device (virtio-rng) has an id of 4.
queue_max_sizes is called during device setup, and specifies the number of virtqueues a device has, and how large each virtqueue is. For example, virtio-net requires at least 3 different virtqueues, 2+ to send / receive packets, and 1 for control. virtio-rng isn’t as complex, and only requires a single virtqueue.
Lastly, activate is called once crosvm finishes setting up the virtio device, and is responsible for spawning a new thread that will monitor the virtqueues for any incoming requests. This method is the one we’ll be focusing on, as it’s where all the magic happens.
Implementing virtio-rng⌗
Lets start by getting some boilerplate out of the way. We’ll create a new virtio device of TYPE_RNG (4) with a single virtqueue of, say, 256 elements.
The activate method will simply spawn a new thread with a Worker that will monitor the queues. We’ll see how the Worker is implemented shortly.
// (greatly simplified from) crosvm/devices/src/virtio/rng.rs

use std::fs::File;
use std::thread;

use sys_util::{EventFd, GuestMemory, PollContext, PollToken};
use super::{Queue, VirtioDevice, TYPE_RNG};

/// Virtio device that exposes host entropy to the guest OS.
pub struct Rng {}

impl Rng {
    /// Create a new virtio-rng device that gets random data from /dev/urandom.
    pub fn new() -> Rng {
        Rng {}
    }
}

impl VirtioDevice for Rng {
    fn device_type(&self) -> u32 { TYPE_RNG }
     // a single queue with 256 slots
    fn queue_max_sizes(&self) -> &[u16] { &[256] }

    fn activate(
        &mut self,
        mem: GuestMemory,
        mut queues: Vec<Queue>,
        mut queue_evts: Vec<EventFd>,
    ) {
        let requestq = queues.remove(0);
        let requestq_evt = queue_evts.remove(0);
        thread::Builder::new()
            .name("virtio_rng".to_string())
            .spawn(move || {
                let mut worker = Worker {
                    requestq,
                    mem,
                };
                worker.run(requestq_evt);
            });
    }
}

struct Worker {
    queue: Queue,     // requestq virtqueue
    mem: GuestMemory, // handle to GuestMemory
}

impl Worker {
    fn run(&mut self, queue_evt: EventFd) -> {
        // TODO
    }
}
This is essentially the actual code for virtio-rng in crosvm, albeit with all the error handling, and some of the more complex interrupt-signaling logic stripped out (for clarity’s sake). It’s pretty straightforward, right?
Lets take a look at the Worker thread now, as that’s where the real “meat” of the device’s implementation is.
crosvm sets up an eventfd-based notification system, so that whenever the guest driver places a request on the virtqueue, the queue_evt event is triggered. Thus, the first we do in the worker thread is poll the EventFd for incoming events:
impl Worker {
    fn run(&mut self, queue_evt: EventFd) {
        #[derive(PollToken)]
        enum Token {
            QueueAvailable,
        }

        let poll_ctx = PollContext::new().add(&queue_evt, Token::QueueAvailable);

        'poll: loop {
            for event in poll_ctx.wait().iter_readable() {
                match event.token() {
                    Token::QueueAvailable => {
                        queue_evt.read(); // acknowledge the event
                        /* process the queue */
                    }
                }
            }
        }
    }
}
Now that all the boilerplate is out of the way, we can write the core logic of the virtio-rng device: getting a buffer from the virtqueue, and filling it with some random bytes from /dev/urandom.
Now, this code is a bit verbose, and fully understanding it requires understanding how virtio recycles virtqueue elements. That said, the code boils down to essentially what you’d expect: iterate over any messages waiting on the queue, write some data from /dev/urandom into the buffer they point to, and signal to the guest that the request has been fulfilled.
impl Worker {
    fn process_queue(&mut self) -> bool {
        let mut used_desc = Vec::new(); // maintain a list of used requests

        for avail_desc in self.queue.iter(&self.mem) {
            // Fill the buffer with data from the random device on the host.
            self.mem.read_to_memory(
                avail_desc.addr, // pointer to buffer in guest memory
                &mut File::open("/dev/urandom").unwrap(),
                avail_desc.len as usize, // size of buffer
            );

            used_desc.push((avail_desc.index, avail_desc.len));
        }

        for &(desc_index, len) in &used_desc {
            self.queue.add_used(&self.mem, desc_index, len);
        }

        if used_desc.size() > 0 {
            // signal to guest that request has been fulfilled
            // implementation omitted for brevity
        }
    }
}
Phew, that’s a lot of code! Especially for something as simple as a RNG device! And that doesn’t even include the complicated setup and kernel driver code!
So what did we gain by going through all that effort?
virtio-rng Performance⌗
Lets compare our virtual rngboi-1337 device to this new virtio-rng device:
| rngboi-1337 | virtio-rng |
|---|---|
| Simple kernel driver and host devices | More complex kernel drivers and host devices |
| Filling a buffer of size N requires N requests | Filling a buffer of size N requires 1 request |
| Requests are synchronous (guest must VMEXIT) | Requests are completely asynchronous |
Although we’ve lost the simplicity of the basic virtual device model, we’ve also gotten rid of any and all VMEXITs, and established a way to mass-transfer data between a guest and host totally asynchronously!
How awesome is that!
Conclusion⌗
I wasn’t exaggerating when I said that paravirtualized devices are a performance panacea for modern VMs. By implementing devices such as network cards, block devices, and even window managers) as paravirtualized devices, modern VMs can provide all the security and convenience of virtualization with near native-hardware performance.
If I’ve whet your appetite for virtual machine internals, paravirtualized devices, and Linux virtualization technologies, check out some of these awesome resources:
- The rust-vmm working group’s work on Github
- Patrick Dumais’s excellent writeup on implementing virtio drivers in his hobby-OS
- Virtio: An I/O virtualization framework for Linux
- High-level introduction to virtualization’s low-level
Thanks for reading!
-
KVM does have a few built-in device models for some very basic devices, e.g: a basic PIC. ↩︎